Knowing how to draw is something most people feel is mostly about artistic talent. You can either draw or you can’t.
I disagree.
Instead, I think drawing is mostly about having a set of specific techniques, that anyone can learn, which make it a lot easier to draw something realistically.
I’m not a professional artist, and so my experience comes mostly from drawing as a hobby. However, as many professional artists have long-since mastered these basic skills, they often struggle to teach them.
I’d like to share what I think some of these basic skills are, along with resources you can use to master them. If you do, I promise that you’ll be able to draw much, much better than you do now.
Seven Core Drawing Skills
Skill #1: See How Things Look (Versus How They Are)
The most basic skill of drawing is to notice how things actually look, instead of what you know they’re really like. This sounds vague and hand-wavey, but it’s really not.
Consider drawing something simple like a table.

Question: How big is each leg of the table?
The obvious answer is that they’re all the same. That’s how tables are built. If they weren’t it would be all wonky.
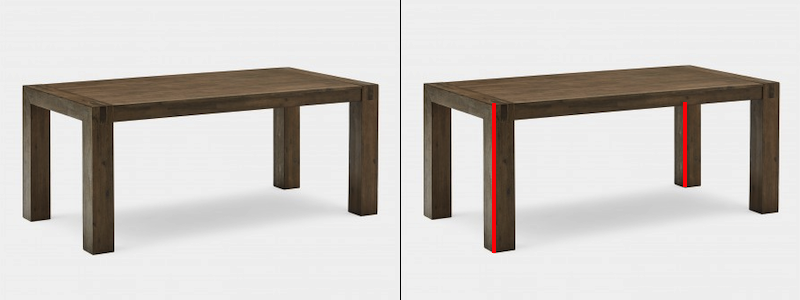
Yet that’s not how a table actually looks. Because some legs are in the background, and viewed at different angles, the lines you put down to represent the table legs aren’t actually the same size.
The first question to ask when drawing is always, “what does it actually look like?” How do the edges of the object actually look, (i.e. what angles do they form and what size are they) rather than what you “know” them to be like as 3D objects.
For a great resource on mastering this core skill, I suggest Drawing on the Right Side of the Brain.
Skill #2: Block In By Comparing Angles and Sizes
If seeing how things actually look is the first skill, the second is using this knowledge in a precise way to make accurate drawings.
There’s a few different ways you can do this.
The easiest is tracing. You copy over an image to preserve the lines and structures in the original. If you have a piece of glass and a dry-erase marker you can even do this to “trace” a real-life scene rather than an image.
The next level up is drawing from a grid. Apply a grid to your scene or image you want to copy, and then draw into a grid on your paper. I did this a lot when I started, and it’s a good way to get better at drawing without feeling like you’re cheating as much.
The final level is to triangulate. This maintains precision without relying on grids and tracing is to block in the shapes by locating reference points and then meticulously building up the scene by comparing angles and sizes of lines. This requires some effort, but it’s my favorite because it allows arbitrary degrees of accuracy and transfers better to looser sketches which don’t use the technique (unlike tracing or grid drawing).
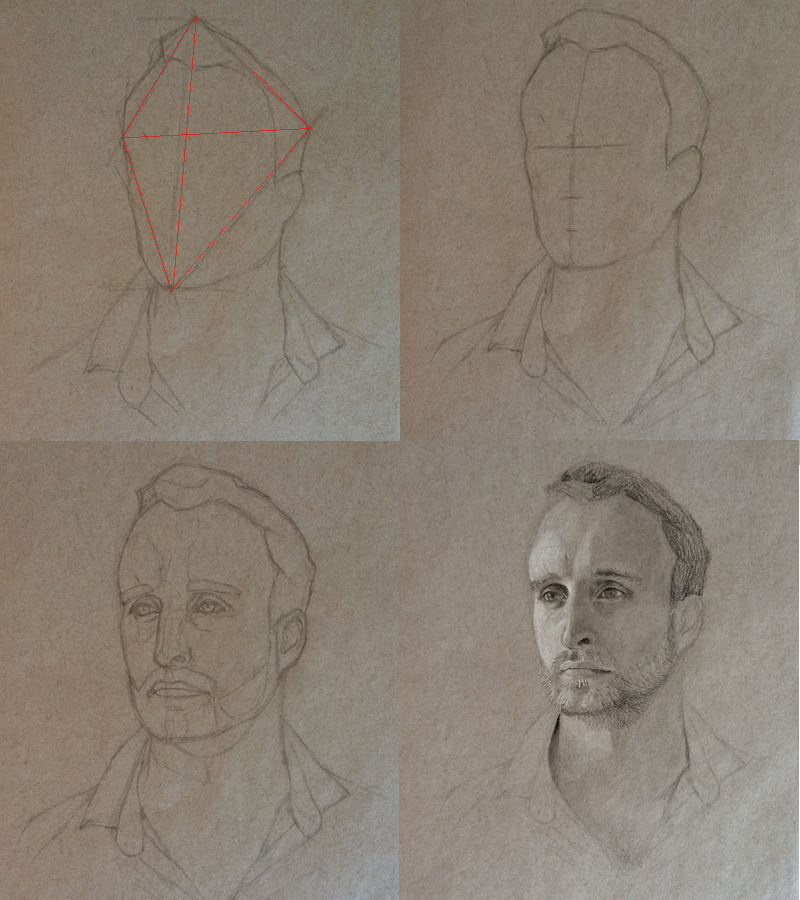
The basics of this technique are as follows:
- Locate a point on the top and bottom of the thing you want to draw. They should “bound” the object on the 2D scene. If you’re trying to draw a flower vase, you might pick the bottom point on the vase and the top of the highest flower.
- Sketch a rough line on your paper on the top and bottom.
- Measure the angle between those points by closing one eye and holding your pencil up to line it up with the two points in your scene. Holding your arm steady, bring it down to your paper and try to copy this line. Do it a few times to make sure you got it right.
- Now pick a point on the left or rightmost side of the object. Do the same thing estimating the angle between it and the point from the bottom. Transfer this line to your paper. Do the same with the top.
- This makes a triangle, which geometrically means that, to the extent your transferred lines were accurate, you have successfully copied the point on the page. Repeat this with a point on the opposite side (left or right) of the object.
- Now you have four points. See if the angle between the left and right point on your paper matches that of your scene.
- To add more points, you just need to measure angles between two points you have on the page, to the one you don’t have yet. Tracing these out slowly can build more and more reference points, which are collectively more and more likely to be accurate as you go on.
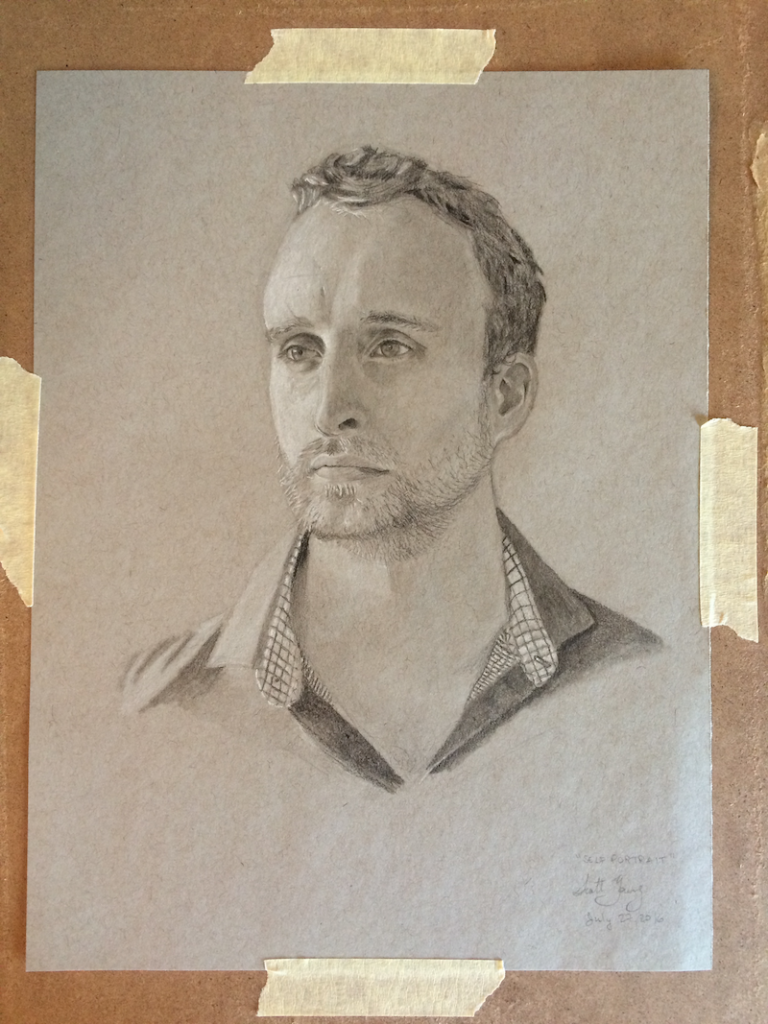
The best resource for learning how to apply this drawing technique is Virtruvian Studios course on drawing.
Skill #3: Get Some Perspective
Drawing is hard because lines which are perpendicular in the real world, become weird angles on 2D scenes due to perspective.
Perspective is particularly important when drawing a scene of regular objects which recede into a distance. Therefore, it’s very important for things like drawing buildings, landscapes or big scenes. It’s less important for drawing faces and still lifes, where the subject doesn’t change all that much in terms of distance to the viewer.
While you can apply the same method as the one above to accurately draw a scene with buildings, it is often more useful as a shortcut to consider making vanishing points instead.
There’s three main types of perspective drawings you might consider:
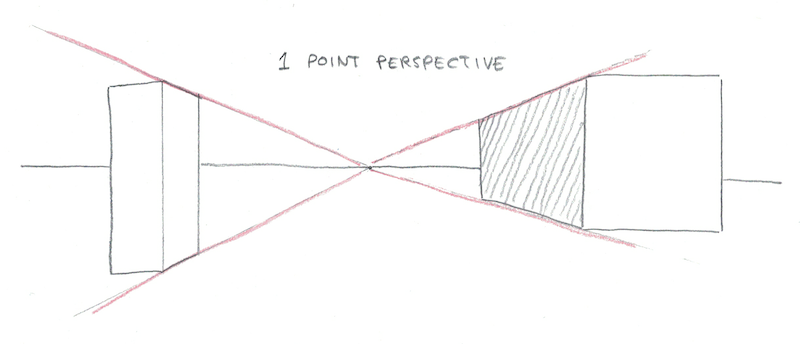
One-point perspective has a single vanishing point. This can happen when you’re looking down a road, for instance, and the buildings, lampposts and statues on the side are receding into the distance. The idea being what in the center is smallest, with what’s on the left and right being bigger and bigger.
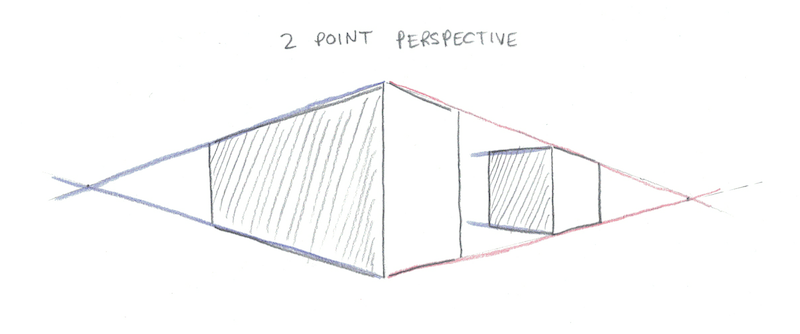
Two-point perspective has two vanishing points. This happens when you’re looking at the corner of a building, and you want to consider two streets going off in each direction. The idea here being that what is in the middle is largest, with everything to the left and right getting smaller and smaller.
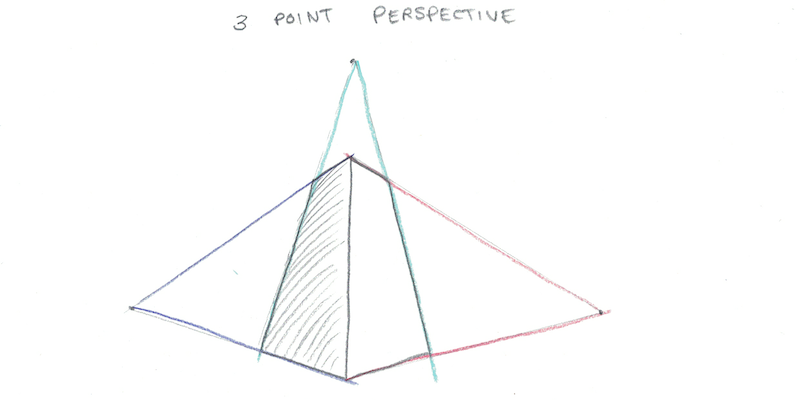
Three point perspective has, you guessed it, three vanishing points. This is like two-point perspective, except now it also recedes above you. This is often the case when you’re looking up at a tall building and the top of the building takes up less room than the bottom, even thought each floor is (in the 3D world) the same size.
The Logic Behind Perspective
When I started learning about perspective, I found it very confusing. When should I use one point? Two points? The dreaded three?
The logic behind vanishing points is that all the lines that go “into” one vanishing point are actually parallel in a 3D scene. Look back at the above images. In a one point perspective, all the lines that go “into” the picture are all parallel. In a two point perspective, in contrast, there are two sets of lines which are themselves pointed in different directions.
This means that a scene can, in theory, have any number of vanishing points, each corresponding to the parallel lines themselves. If you’re doing a sketch of an old European city, for instance, you may have buildings that sit at strange angles to each other, resulting in a set of lines and vanishing points for each.
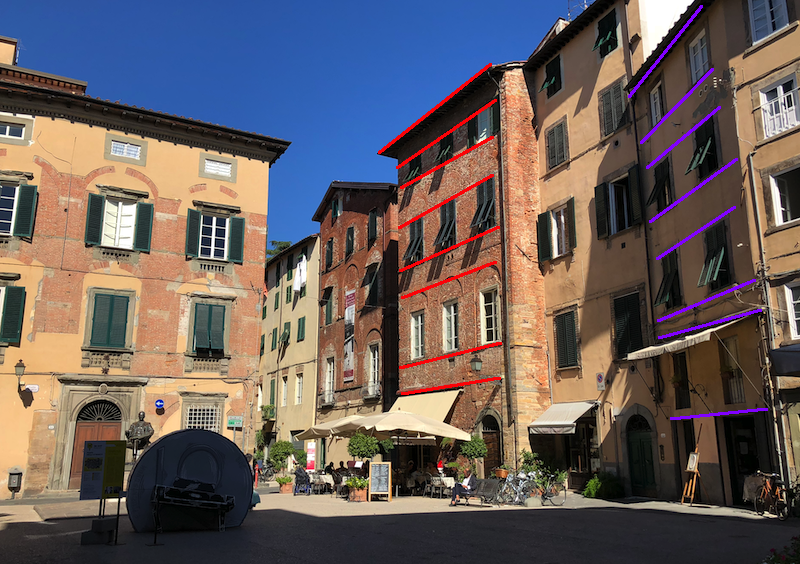
Don’t get hung up on the technicalities of vanishing points when you get started. Instead, use them as a benchmark for blocking in your scene. If you know a group of lines (say all the tops of windows for a building) are going to be parallel, you can quickly estimate the vanishing point and sketch them all in more accurately than trying to guess the angle of each one on its own
Use Perspective Lines to Make Better Guesses
You can get started with this by actually drawing vanishing points and making your buildings or objects fit. A quicker way, once you’re more experienced is simply to expect the lines in your buildings to be self-consistent.
If you’re sketching a building for instance, and decide to draw the top of a roof at a 15 degree angle, and you know it recedes off to the right, then you know the tops of your windows can’t be at a sharper angle than that one.
This rule-of-thumb can help you make self-consistent drawings much faster than the painstaking method of triangulating points, by exploiting the regularity in the structures you want to draw.
Skill #4: Don’t Get Tricked by Relative Contrast
We’ve already seen how applying our knowledge of the 3D world to 2D drawings can lead to misleading images. But, that was relatively minor to the problems relative contrast can cause.
Consider this famous optical illusion:

The two squares are exactly the same value, except one looks light and the other dark. Relative contrast makes it very easy to overestimate the lightness of light objects in shadow and the darkness of dark objects in the light.
How can you avoid this problem? One way is to take a photograph and open it up in an image editing program like photoshop. There you can use the eye-dropper tool and actually sample the local value and see how it compares to other things you’ve already drawn.
Except that feels a bit like cheating. Plus it doesn’t really train your mind to sense the correct brightness value just by looking at the objects.
How do artists overcome their brain’s tendency to adjust for relative contrast? By squinting.

That may sound ridiculous, but it actually works. Squinting, so you’re seeing the scene as a blurry set of shapes through your eyelashes, reduces a lot of the information in the scene. It also turns the scene into splotches of light and dark which are easier to assess on their own without the distractions of relative contrast.
Try it yourself, pick out two objects in the room and squint to compare their brightness. Now open your eyes and see how they look without squinting. Do you see a difference?
Squinting is just one technique, but if you really want to understand how to draw lights and darks, I suggest How to Draw Light & Shadow by Will Kemp.
Skill #5: Get the Big Stuff Right, and Let the Details Take Care of Themselves
A mistake I made a lot early on in drawing was putting in a lot of details on one section, without filling in everything else. I’d try to draw a boat, and I’d start putting in the lettering I see on the side of the ship before I’ve even sketched out any of the scene.
One theory I have about why this often doesn’t work, is that people have expectations of accuracy. If I show you a really low-resolution photograph, or an impressionistic painting, you’re unlikely to say it lacks artistic merit, just because it isn’t photorealistic. The relationships it does portray are accurate enough that you can see what it is.
On the other hand, if you make part of your image extremely accurate, it makes deviations from accuracy on bigger things much more noticeable. A face drawn realistically will be judged much worse for slight imperfections than one done as a sketch.
A useful skill to learn when drawing, therefore, is to start by getting the big things right. How big is the thing you’re drawing? How much wider is it than it is tall? How big is it compared to the other things you’re putting in?
Once you’ve mapped those things out right, you can actually be pretty loose with a lot of details and still have a “realistic” looking drawing. Look at the windows on this painting. They are basically splotches, yet we accept it as realistic because the big things were done right.


Skill #6: Watch Your Curves Carefully
Curves are a lot harder to draw than straight lines. For starters, they’re more complicated than lines. You need more information to represent a curve than a straight line, so there’s more ways you can screw one up.
Second, curves often are harder to freehand draw accurately. A straight line, with practice, isn’t too hard to do freehand, even if it doesn’t meet the accuracy of one done with a ruler. However, curves often go against the natural motion of your hand, so it’s often the case that you’ll draw it wrong if done in a single motion.
The starting point, as always, is to see how the curve really is. If you had to draw tangent lines on its surface, what would they be? Does it form corners, or does it stay curved the whole way? A common mistake when drawing vases in still lifes is to kink the corners at the end, not recognizing that it will form an ellipse instead.
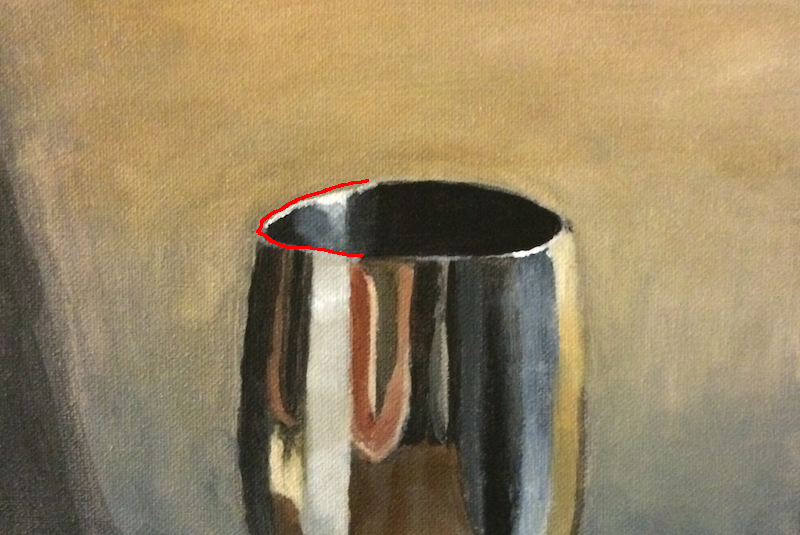
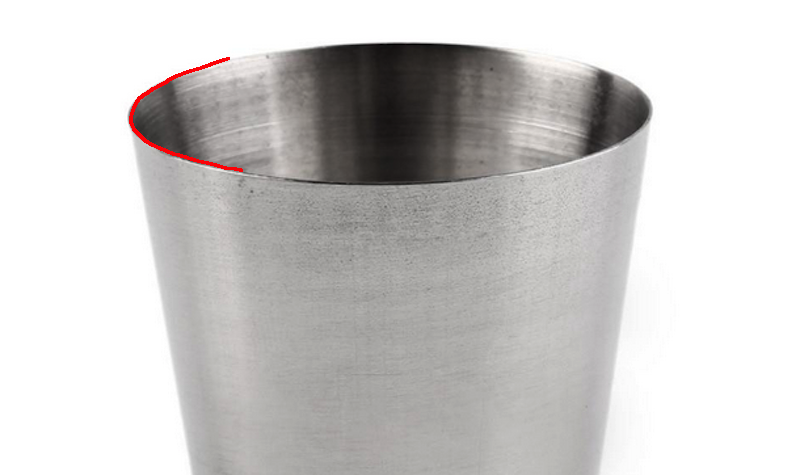
Next, you can sketch out a few line segments to break up a complex or sharply turning curve into a few straight-line segments as approximation. This will help you stay roughly in the right ballpark when you put curves in.
Finally, draw your curve, asking yourself how it is accelerating and slowing down at different parts of your line segment.
Skill #7: Don’t Be Afraid to Draw Things
All of these skills don’t matter if you don’t practice them. The biggest obstacle to drawing is fearing that it won’t turn out right—that you’ll put effort in and you’ll end up with something embarrassing.
This is why I think some people have convinced themselves they don’t have artistic talent.
At some point they received negative feedback about something they drew, either from a peer, teacher or parent (or even from their own expectations) and this made drawing something frustrating, instead of pleasant. They stopped doing it because thinking of drawing brings up those old fears and anxieties.
However, the truth is that drawing is mostly about cultivating a bunch of specific, learnable skills like the ones above. Anyone can learn them, they just require practice. In order to practice, you need to stop being afraid of drawing.
There’s a few ways you can build up your confidence to master these skills:
- Start with easier subjects and methods. Drawing portraits with the triangulation method too hard? Try drawing a still life using the tracing approach or with a grid.
- It’s okay to keep your first drawings private. You don’t need to show your mistakes, just the ones that turned out well. Even many professional artists often re-do things multiple times until they’re happy with them, so why can’t you?
- Making daily drawing a habit. Set yourself the goal of drawing something every day, even if it’s just a quick sketch of something lying around the house that you spend five minutes on.
Don’t give up and keep practicing to draw better!
Resources mentioned in this post:
- Drawing on the Right Side of the Brain – Teaches many core drawing skills.
- Vitruvian Studios – Teaches “triangulation” approach to accurate drafting, plus realistic portraiture
- Will Kemp’s courses (I’m also a fan of his courses for acrylic painting) – Useful complement to Drawing on the Right Side of the Brain, especially if you find you learn better through demonstration than text.
 I'm a Wall Street Journal bestselling author, podcast host, computer programmer and an avid reader. Since 2006, I've published weekly essays on this website to help people like you learn and think better. My work has been featured in The New York Times, BBC, TEDx, Pocket, Business Insider and more. I don't promise I have all the answers, just a place to start.